pillow.readthedocs.io/en/stable/installation.html#basic-installation


Installation — Pillow (PIL Fork) 8.0.1 documentation

Build flags: --disable-zlib, --disable-jpeg, --disable-tiff, --disable-freetype, --disable-lcms, --disable-webp, --disable-webpmux, --disable-jpeg2000, --disable-imagequant, --disable-xcb. Disable building the corresponding feature even if the development

pillow.readthedocs.io


exif 정보를 불러올 수 있는 모양


  exif 정보는 아래와 같은 정보를 담고 있음

www.awaresystems.be/imaging/tiff/tifftags/privateifd/exif.html


EXIF Tags

TIFF Tag Reference, Exif Tags Exif tags are used largely to encode additional information related to image generation by digital still cameras. Exif is the abbreviation of 'Exchangeable image file format', though this can be argued to be a misnomer, as Exi

www.awaresystems.be


PIL 을 이용해서 jpg 파일의 정보를 출력하는 간단한 프로그램


from PIL import Image
im = Image.open('5D3_9369.JPG')
takentime = im.getexif()[36867]
print (im.format, im.size, im.mode, takentime)


결과 


JPEG (5760, 3840) RGB 2020:10:18 12:50:39

'Python' 카테고리의 다른 글

Macbook Catalina Python 개발 환경 잡기  (0) 2020.11.28
Python 연습 프로젝트 1  (0) 2020.11.28
Tkinter 를 이용한 시계  (0) 2017.06.27
Mac에서 Python 개발 환경 구축하기  (0) 2016.02.18
import  (0) 2016.02.08

 - Visual Studio Code

code.visualstudio.com


Visual Studio Code - Code Editing. Redefined

Visual Studio Code is a code editor redefined and optimized for building and debugging modern web and cloud applications.  Visual Studio Code is free and available on your favorite platform - Linux, macOS, and Windows.

code.visualstudio.com

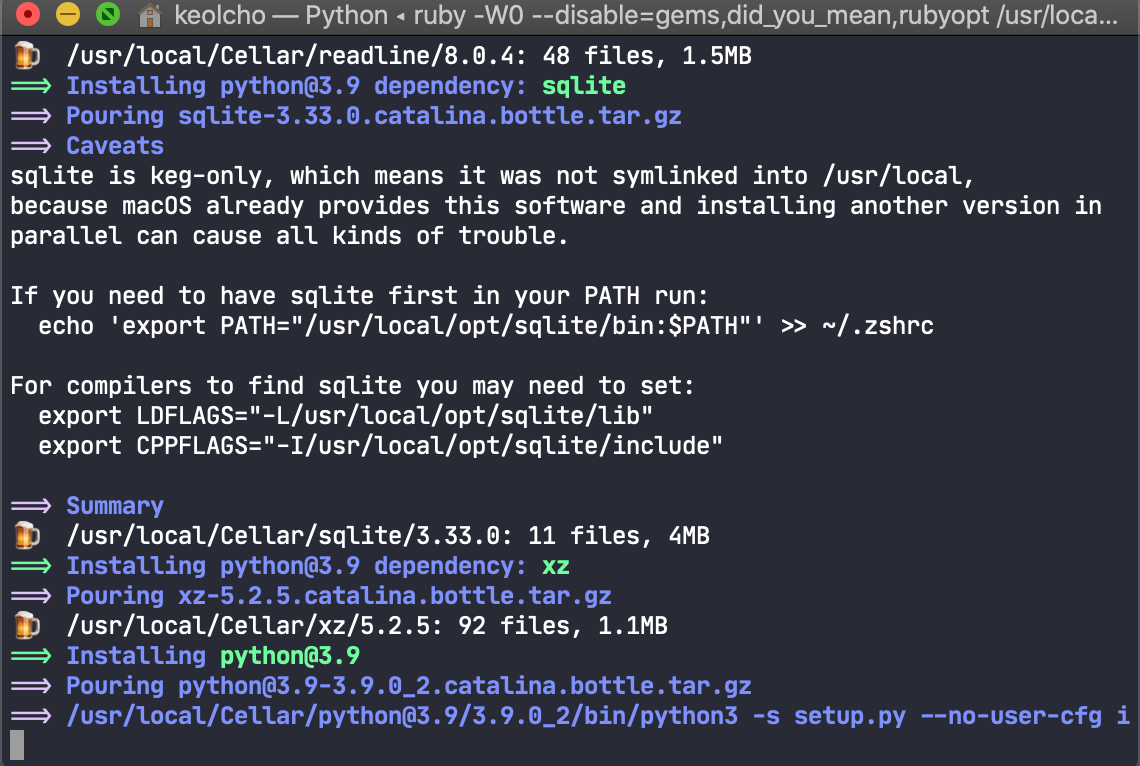
- brew

brew.sh


 - Python3.8.2

medium.com/front-end-weekly/how-to-install-the-latest-python-3-on-mac-with-no-issues-5db0045e1429


 - pip 

www.geeksforgeeks.org/how-to-install-pip-in-macos/#:~:text=pip%20can%20be%20downloaded%20and%20installed%20using%20command-line,3%20Voila%21%20pip%20is%20now%20installed%20on%20


- Visual Studio Code 에서 python extension 들 설치

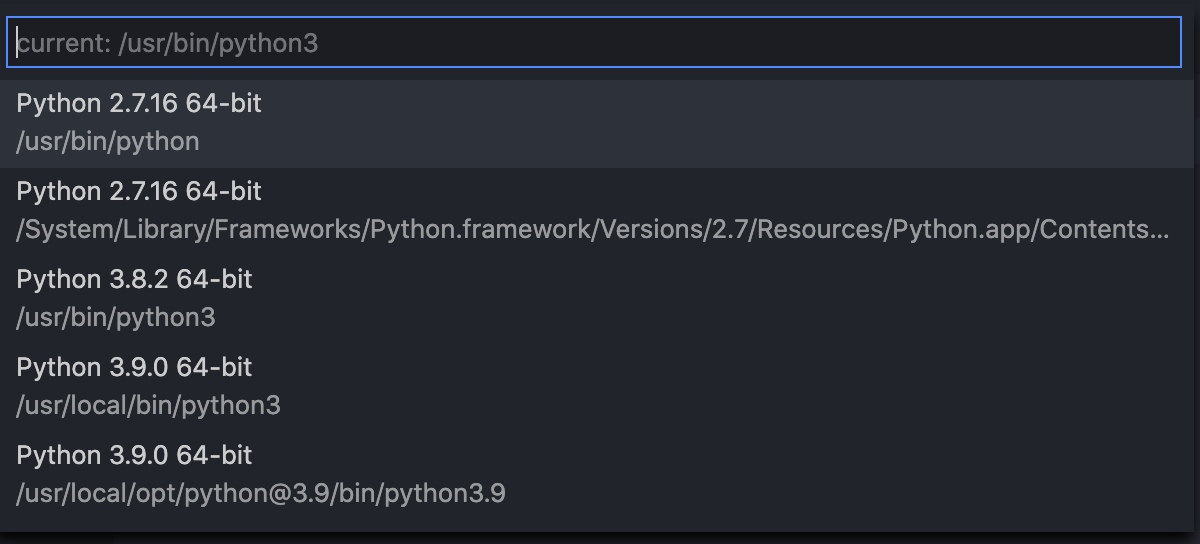
- Visual Studio Code 에서 python interpreter 설정

 : ⌘+⇧+p 

 : Python: Select Interpreter


사용할 python version 선택


 - 번외 : Mac Terminal 용 Dracula theme 설치

'Python' 카테고리의 다른 글

Python JPEG 사진 정보 불러오기 : pillow  (0) 2020.11.28
Python 연습 프로젝트 1  (0) 2020.11.28
Tkinter 를 이용한 시계  (0) 2017.06.27
Mac에서 Python 개발 환경 구축하기  (0) 2016.02.18
import  (0) 2016.02.08

원하는 기능

특정 폴더에 있는 사진파일을 읽어 년도 아래 월 폴더를 만들어 이동시키기


연습 목록

1. Python 으로 사진파일 정보 중 촬영날짜 읽어오기

loekohcoder.tistory.com/27

2. Python 으로 디렉터리 확인 및 생성


3. Python 으로 파일 이동

'Python' 카테고리의 다른 글

Python JPEG 사진 정보 불러오기 : pillow  (0) 2020.11.28
Macbook Catalina Python 개발 환경 잡기  (0) 2020.11.28
Tkinter 를 이용한 시계  (0) 2017.06.27
Mac에서 Python 개발 환경 구축하기  (0) 2016.02.18
import  (0) 2016.02.08

somthing.csh 파일 수행 시
0: Event Not Found 가 나오는 경우


something.csh 파일 첫 줄에
#!\bin\csh
이 있는 경우
echo 나 print 로 출력시 출력하는 문구에 ! 가 있으면 위의 에러가 발생 됨.
! 를 출력하고 싶으면
echo "\!" 를 사용할 것.
아니면 echo '!' 를 사용할 것

'etc.' 카테고리의 다른 글

VS code  (0) 2018.11.02
bash script 예제  (0) 2016.03.14

VS Code 가 핫하다길래 장비병 환자인 내가 또 안깔아볼 수는 없지.


Atom 을 바로 삭제함.

'etc.' 카테고리의 다른 글

csh: Event Not Found  (0) 2020.11.24
bash script 예제  (0) 2016.03.14

# clock.py  By Anton Vredegoor (anton.vredegoor@gmail.com) 

# last edit: july 2009,

# license: GPL

# enjoy!


"""

A very simple  clock.


The program transforms worldcoordinates into screencoordinates 

and vice versa according to an algorithm found in: "Programming 

principles in computer graphics" by Leendert Ammeraal.


"""


from Tkinter import *

from time import localtime

from datetime import timedelta,datetime

import sys, types, os


_inidle = type(sys.stdin) == types.InstanceType and \

  sys.stdin.__class__.__name__ == 'PyShell'


class transformer:


    def __init__(self, world, viewport):

        self.world = world 

        self.viewport = viewport


class clock:


    def __init__(self,root,deltahours = 0):

        self.world       = [-1,-1,1,1]

        self.bgcolor     = '#ffffff'

        self.timecolor   = '#000000'

        self._ALL        = 'all'

        self.pad         = 25

        self.root        = root

        WIDTH, HEIGHT = 200, 200

        root.bind("<Escape>", lambda _ : root.destroy())

        self.delta = timedelta(hours = deltahours)  

        self.canvas = Canvas(root, 

                width       = WIDTH,

                height      = HEIGHT,

                background  = self.bgcolor)

        viewport = (self.pad,self.pad,WIDTH-self.pad,HEIGHT-self.pad)

        self.T = transformer(self.world,viewport)

        self.root.title('Clock')

        self.canvas.bind("<Configure>",self.configure())

        self.canvas.pack(fill=BOTH, expand=YES)

        self.poll()


    def configure(self):

        self.redraw()


    def redraw(self):

        sc = self.canvas

        sc.delete(self._ALL)

        width = sc.winfo_width()

        height =sc.winfo_height()

        sc.create_rectangle([[0,0],[width,height]], fill = self.bgcolor, tag = self._ALL)


        viewport = (self.pad,self.pad,width-self.pad,height-self.pad)

        self.T = transformer(self.world,viewport)

        self.paintgrafics()


    def paintgrafics(self):

        self.painthms()


    def painthms(self):

        sc = self.canvas

        T = datetime.timetuple(datetime.utcnow()-self.delta)

        x,x,x,h,m,s,x,x,x = T

    #self.root.title('%02i:%02i:%02i' %(h,m,s))

        now = datetime.now()

        curTime = now.strftime('%H:%M:%S')

        workTime = now-startTime;

        sc.create_text(100,10,fill="black",text="NOW  :"+curTime)

        sc.create_text(100,30,fill="orange",text="START:"+startTime.strftime('%H:%M:%S'))

        if (workTime.seconds > 5) :

            sc.create_text(100,50,fill="magenta",text="Go to HOME!!")

        if (workTime.seconds > 8) :

            sc.create_text(100,70,fill="magenta",text="15,000!!")

    def poll(self):

        self.configure()

        self.root.after(200,self.poll)


def main():

    root= Tk()

    global startTime

    startTime = datetime.now()

    clock(root,deltahours = -9)

    if not _inidle:

        root.mainloop()


if __name__=='__main__':

  main()


'Python' 카테고리의 다른 글

Macbook Catalina Python 개발 환경 잡기  (0) 2020.11.28
Python 연습 프로젝트 1  (0) 2020.11.28
Mac에서 Python 개발 환경 구축하기  (0) 2016.02.18
import  (0) 2016.02.08
functions  (0) 2016.02.08
#include <stdio.h>
#include <math.h>
#include <stdlib.h>
#include <iostream>
#include <iomanip>
#include "awgn.h"

using namespace std;
// fixed-point header file
// Qm.f
// m: the number of bits for integer
// f: the number of bits for fraction 

typedef signed short fx_t;

#define M 3  // m
#define F 2  // f


#define F_MAX ( ( 1 << (M+F) ) - 1 )
#define F_MIN ( -1 * ( 1<<(M+F) ))
#define Fl2Fx(x) (fx_t) (x >= 0) ? ( (x * (1 << F)) + 0.5 ) : ( (x * (1 << F)) - 0.5 )    //floating to fixed-point (using integer)
#define Fx2Fl(x)  (((float)x)/(1 << F))


fx_t sat_check(fx_t x)
{
    if (x > F_MAX)
        return F_MAX;
    else if (x < F_MIN)
        return F_MIN;
    else
        return x;
}

int main(void){

    float R = 0.5;
    double snr = 3.0;
    double sigma;

    double max = 0;


    const int N = 100; //length

    float sample[N] = { 0 };
    fx_t f_sample[N] = { 0 };  //fixed point
    fx_t q_sample[N] = { 0 };  // quantized

    int q_bit = 4; // the number of bit for quatization
    int q_max = pow(2, q_bit) - 1;

    //fixed-point 에서의 maximum 값, overflow 처리 필요.

    cout << "Max. Fixed-Point :" << F_MAX << endl;
    cout << "Min. Fixed-Point :" << F_MIN << endl;
    //getchar();
    sigma = pow(10, -0.05*snr) / sqrt(2 * R);

    //cout << "Orig.\t\tFixed\t\tFx_int\t\tFx_fl" << endl;
    for (int i = 0; i < N; i++)
    {
        float temp;
        sample[i] = 1 + gaussian(0, sigma);

        f_sample[i] = Fl2Fx(sample[i]);
        //temp = (int)(sample[i] * (1 << F));
        //temp = (float)temp / (1 << F);
        //cout << setw(8) << sample[i] << "\t" << temp << "\t\t";

        //printf("%d\t\t", f_sample[i]);
        //printf("%f\n", Fx2Fl(f_sample[i]));
        //putchar('\n');
    }
    cout << "F_samp\t\tOrig.\t\tSat" << endl;
    fx_t temp = 0;
    for (int i = 0; i < N; i++)
    {

        temp += f_sample[i];
        cout << f_sample[i]<<"\t\t"<<temp << "\t\t" << sat_check(temp) << endl;
        getchar();
    }
    cout << endl;
    cout << "maximum:  " << max << endl;

    return 0;
}

fixed_point_proto.md


'C and C++' 카테고리의 다른 글

Fixed-point in C/C++  (0) 2016.04.05
main function arguments  (0) 2016.03.11
OpenMP in Macbook  (0) 2016.03.10
OpenMP  (0) 2016.03.09
C언어 최적화 기법  (0) 2016.02.05

fixed-point in C

original material: artist-embedded.org/EmbeddedControl Slides
reference 1: fixedpt.html
reference 2: Q_format

1. Fixed-point Representation

  • x: real number
  • X: fixed-point number
  • N: wordlength
  • m: integer (excluding sign bit)
  • f: number of fraction bit
  • “Q-format” : Qm.n
0/1101/011
sign bit/4bit integer/3bit fraction

2. Conversion to and from fixed-point

  • real to fixed

    • Multiply the floating point number by 2^f
    • Round to the nearest integer

      X=round(x˙2f)

  • fixed to real

    x=X˙2f

example) 13.4 to Q4.3 format

X=round(13.4˙23)=107(=011010112)

3. Range of fixed-point representation

  • negative number: 2’s complement

    • N=8, 2^(-8) ~ 2^(8-1)
      binary representation decimal
      00000000 0
      00000001 1
      00000010 2
      01111111 127
      10000000 -128
      10000001 -127
      11111111 -1
  • range of Qm.f [ref]

    [2m,2m2f]

4. Arithmetic operations of fixed-point

  • Satuation check
int16_t sat16(int32_t x)
{
    if (x > 0x7FFF) return 0x7FFF;
    else if (x < 0x8000) return 0x8000;
    else return (int16_t)x;
}
  • Addition
int16_t q_add_sat(int16_t a, int16_t b)
{
    int16_t result;
    int32_t tmp;

    tmp = (int32_t)a + (int32_t)b;
    if (tmp > 0x7FFF)
        tmp = 0x7FFF;
    if (tmp < -1 * 0x8000)
        tmp = -1 * 0x8000;
    result = (int16_t)tmp;

    return result;
}
  • Subtraction
int16_t q_sub(int16_t a, int16_t b)
{
    int16_t result;
    result = a - b;
    return result;
}
  • Multiplication
// precomputed value:
#define K   (1 << (f - 1))    // f: fraction of fixed-point

int16_t q_mul(int16_t a, int16_t b)
{
    int16_t result;
    int32_t temp;

    temp = (int32_t)a * (int32_t)b; // result type is operand's type
    // Rounding; mid values are rounded up
    temp += K;
    // Correct by dividing by base and saturate result
    result = sat16(temp >> Q);

    return result;
}
  • Division
int16_t q_div(int16_t a, int16_t b)
{
    int16_t result;
    int32_t temp;

    // pre-multiply by the base (Upscale to Q16 so that the result will be in Q8 format)
    temp = (int32_t)a << Q;
    // Rounding: mid values are rounded up (down for negative values).
    if ((temp >= 0 && b >= 0) || (temp < 0 && b < 0))
        temp += b / 2;
    else
        temp -= b / 2;
    result = (int16_t)(temp / b);

    return result;
}

'C and C++' 카테고리의 다른 글

Fixed Point Prototype  (0) 2016.04.09
main function arguments  (0) 2016.03.11
OpenMP in Macbook  (0) 2016.03.10
OpenMP  (0) 2016.03.09
C언어 최적화 기법  (0) 2016.02.05

bash script를 이용해 실험 여러 번 돌리기.

컴퓨터 한테 한꺼번에 많은 일들을 시키기 위해 결국 bash 스크립트도 조금 알아보았다. 대단한 것은 아니고, 인자들을 바꾸어가며 실험을 여러 번 돌리고, 매 번 실행되는 결과 파일을 파라메터에 맞게 네이밍 하는 것.

생각보다 bash script로는 많은 것을 할 수도 있었지만, 제약사항도 조금 있었다. 다들 그래서 python 을 사용하나보다.

#! /bin/bash

for (( i = 1.8 ; i <= 3.0 ; i+=0.2 ))
do
    ./a.out $i 2.3
    f=1.8+$i
    mv a.txt hey_$f.txt
#done

배포할 목적이 아니라 예외처리는 전혀 안되어 있지만, 그리고 실제로 실험에 사용한 코드도 이것이 아니긴 하지만, 무튼 이런 식으로 할 수 있다는 것. (()) 이 중첩 괄호 사이에 넣으면 C 구문도 넣을 수 있다고… 하지만 실수 연산이 안되기 때문에 뭔가 다른 방법을 사용했던 것 같은데, 지금 나는 절실히 필요한 것이 아니니 다음 기회로 넘기자.

우선 a.out 이라는 프로그램은 인자가 두 개 들어가는 실행 프로그램이다. $i 는 bash script 에서는 변수 i 를 뜻한다. 연산은 안되지만 실행할 때 대입은 되는 신기한 상황. 무튼, 변수를 바꿔가며 조건을 만족할 때까지 실행한다.

a.out 은 실험 결과로 a.txt를 생성하는데, 실행이 끝날 때마다 a.txthey_$f.txt로 이름을 바꾸어준다.

주말동안 열심히 서버에다가 일을 시켜 두었으니, 월요일에 출근해서 살펴봐야겠다.

윈도우용 .bat 파일도 이런 식으로 스크립트를 만들 수 있는 것 같으니, 서버 말고 연구실 메인 컴퓨터도 실험을 돌리자.

Do or do not. There’s no try. 아자.

'etc.' 카테고리의 다른 글

csh: Event Not Found  (0) 2020.11.24
VS code  (0) 2018.11.02

main 함수의 argument

#include <stdio.h>

int main(int argc, char* argv [])
{
    printf("num_of_param: %d, program_name: %s", argc, argv[0]);
}

참고자료

프로그램을 실행할 때 인자를 받아와서 프로그램에서 사용할 수 있다. scanf로 받아오는 것으로 짜려고 했더니 bash script 로 여러 번 실행할 수가 없어서 다시 써볼까 싶어 찾아봤는데, 하도 오래 전에 써본 터라 기억이 제대로 나지 않았다. 공부한 김에 메모하는 것으로.

위의 프로그램을 컴파일하고 아무런 인자도 넣지 않은 채 실행하면 다음과 같은 결과를 볼 수 있다.

num_of_param: 1, program_name: ./b.out

ps. b.out은 컴파일 후 생성된 실행파일이다.

이 예제를 통해 메인함수는 기본적으로 프로그램 이름을 하나의 인자로 가진다는 것을 알 수 있다.

문제는 이렇게 받아오는 인자가 문자열이라는 것.

가장 단순한 해결방법으로는 묵직한 atoi함수를 사용하는 방법이다.

일단 실험이 급하니 이것부터 이용해서 해볼까 싶다.

#include <stdio.h>
#include <stdlib.h>

int main(int argc, char *argv[])
{

    printf("input was %d and %d", atoi(argv[1]), atoi(argv[2]) );

    return 0;

}

위 코드를 컴파일한 후 $>a.out 1 2 이렇게 실행하면 다음과 같은 결과를 볼 수 있다.

input was 1 and 2

'C and C++' 카테고리의 다른 글

Fixed Point Prototype  (0) 2016.04.09
Fixed-point in C/C++  (0) 2016.04.05
OpenMP in Macbook  (0) 2016.03.10
OpenMP  (0) 2016.03.09
C언어 최적화 기법  (0) 2016.02.05

+ Recent posts